


The issue of Blink not recording to USB is a common and perplexing one that many users face. Cannot save crucial footage when acting as home guardians, Blink cameras can leave one feeling unsettled. I am Erfan Askari, the creator of Smart Home Scope, and in this article, I will walk you through effective solutions that can be taken to settle this problem once and for all, restoring your peace of mind.
Blink Camera not Recording to USB: Key Takeaway
To overcome the Blink camera not recording to USB issue, ensure that your flash drive is formatted to exFAT or FAT32, doesn’t exceed 256GB, and is properly inserted into the Sync Module. If you are still facing the problem, try power cycling the Sync Module by unplugging it from the power source and then plugging it back in after waiting for about a minute. If the problem isn’t fixed yet, then try to reset the Sync Module to factory settings as a last resort. Also, check for possible firmware updates in the app to maintain optimal performance for your Blink system.
These are the steps we will go through step-by-step in this article; so, buckle up and get ready for a journey to deal with your Blink camera not recording to USB!
Why Blink Cameras Are a Popular Choice
The simple, wire-free setup of Blink cameras, along with their recognizable affordability have made this brand a popular choice among smart home enthusiasts. Home security is made effective and convenient with advanced motion detection, long battery life, and smart home integration, which are the offerings. We favor Blink for enhancing home security efficiently due to its blend of features.
Understanding the Blink Camera not Recording to USB Issue
From time to time, I hear about customers complaining about their Blink camera not working properly; the Blink cameras sometimes have trouble recording to USB, an issue that can originate from various causes. Mainly, the USB drive is not recognized by the Sync Module because of improper formatting or insufficient storage space.
The USB drive you use, must be formatted to either exFAT or FAT32, and there should be at least a minimum of 400 MB available on it for system files. Numbers up to 256 GB are the only size USB drives that can be used with the Sync Module. To guarantee seamless local storage functionality and safeguard your recordings without reliance on cloud storage or uninterrupted Wi-Fi connection, your flash drive must meet these specifications.
Blink not Recording to USB Issue: Detailed Solutions
1. Blink Camera not Recording to USB: Ensuring Proper Flash Drive Format and Capacity
The flash drive’s format and capacity need to be checked as one of the initial steps in resolving Blink’s USB recording issue. The USB drive needs to be formatted as either exFAT or FAT32 for Blink Sync Modules. These formats can handle universally the file sizes generated by security camera footage and are compatible. Plus, the system will not recognize drives with a capacity exceeding 256 GB.
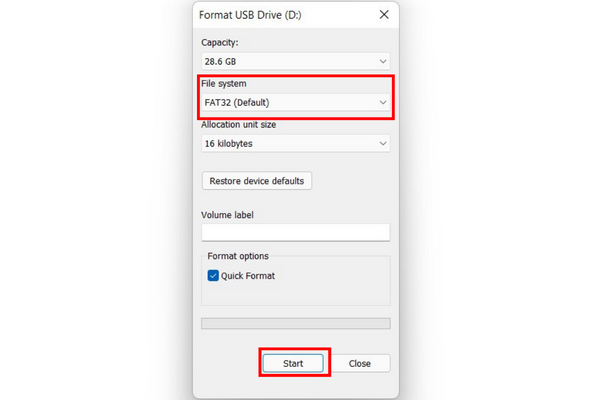
How to Format Your Flash Drive on Windows
- Connect the USB drive to your PC.
- Open “This PC” or “My Computer.”
- Right-click on the USB drive and choose the ‘Format’ option.
- Under ‘File System’, choose ‘FAT32’ or ‘exFAT’.
- The drive formatting process will begin when you click ‘Start’. It is more than vital to remember that this action leads to data loss on the drive.
How to Format Your Flash Drive on Mac
- Connect the USB drive to your Mac.
- Open ‘Disk Utility’ from the Applications > Utilities folder.
- Select the USB drive from the sidebar.
- Click ‘Erase’, then choose ‘FAT32’ or ‘exFAT’ as the format.
- Click ‘Erase’ to format the drive. Ensure you’ve backed up any important data.
Ensuring Sufficient Space
Your USB drive should have at least 400 MB of free space for Blink’s system files to be installed. Recommended for continuous recording is a larger capacity, yet it should not surpass 256 GB. Your Blink system can benefit from a dedicated flash drive by ensuring that there’s always enough space to store data without any need to manage it from time to time.
Any format and capacity issues are dealt with by going through the steps I mentioned above, issues that are usually responsible for Blink camera not recording to USB.
Blink not Recording to USB: Checking the Sync Module and Flash Drive Compatibility
Ascertain Blink Sync Module’s USB harmony through apt format and capacity; despite meeting specs, USB drives’ performance may fluctuate and some may lead to Blink camera not recording to USB issue.
The Blink Sync Module needs to be compatible with your correctly formatted and within-capacity flash drive. USB drives do not perform uniformly with Blink systems, despite meeting the fundamental format and size specifications. You can check and ensure compatibility by following these steps:
1. Test the Flash Drive’s Functionality
The flash drive should be connected first to a computer for verification of its proper functioning. Look for signs of malfunction or corruption, see if there’s any difficulty in copying files to the drive or slow performance.
2. Connect the Flash Drive to the Sync Module
The USB drive should be connected to the Sync Module after confirming it functions well on a computer. Make sure the connection is secured and the drive fits tightly into the USB port.
3. Monitor the Blink App for Recognition
Open the Blink app on your smartphone or tablet. Navigate through its settings to determine if the Sync Module identifies the flash drive. Your drive is compatible if the app indicates that local storage is active.
4. Use a Recommended Flash Drive
Consider a flash drive recommended by Blink or using one that has been confirmed by other users to work well if compatibility issues persist. High-quality USB 3.0 drives, with their fast write speeds, have found success among some users despite the Sync Module using a USB 2.0 interface.
The Blink Sync Module can significantly increase the likelihood of successful USB recording by ensuring that the flash drive is correctly formatted, of the right capacity, and compatible with it.
Blink Camera not Recording to USB: Power Cycling and Resetting the Sync Module
The Blink Sync Module may require power cycling and a reset if your flash drive is correctly formatted, within the specified capacity, and deemed compatible, but you’re still encountering issues with USB recording. The system’s internal state can be refreshed to resolve temporary glitches during these processes.
Power Cycling the Sync Module
- Disconnect Power: Disconnect the Sync Module from its power source. The electrical power to the device is cut off by this action.
- Wait: About one minute should be allowed for the Sync Module to remain unplugged. The waiting period drains any residual power from the module, effectively resetting its internal state.
- Reconnect Power: The Sync Module should be plugged back into the power source. The device should be given time to complete the booting process and then reconnect to the network.
- Check Functionality: After the Synce Module is back on track and online, check if the Blink camera not recording to USB issue is resolved or not.
Resetting the Sync Module to Factory Defaults
In a scenario where all the measures mentioned above fail to deal with a Blink camera not recording to USB, the final step is resetting the Sync Module to factory settings. It is important to know that this is the last resort since a reset factory erases all current settings and takes the Sync Module back to its original state. You must reconfigure your Blink system settings after the factory reset.
- Locate the Reset Button: There is a small reset button found on the back of your Blink Sync Module.
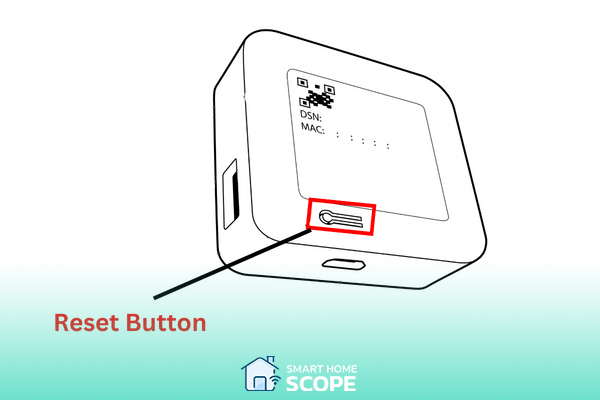
- Press and Hold: Press and hold the reset button using a paperclip or a similar tool, holding it for about 5 seconds is enough, you will see a red light flash indicating that the resetting process has been initiated.
- Reconfigure the Sync Module: After the factory reset is complete, the Sync Module needs to be added to you Blink system again using the app. If you don’t know how to go through that process, read our connect Blink camera guide.
- Reattach the USB Drive: After setting up the Sync Module, reconnect the USB drive to see if the issue is resolved.
The Blink Sync Module can be effectively troubleshooted by power cycling and resetting it. The USB drive may not be recording the Blink camera footage due to software glitches or communication errors. These steps can assist in resolving such issues.
Maintaining the Sync Module for Optimal Performance
A diligently upheld Sync Module diminishes USB recording impediments
The Blink Sync Module needs to be maintained regularly for efficient operation, particularly with regard to its USB port and power supply. A Sync Module that is well-maintained is less likely to face Blink not recording to USB issue. The Sync Module needs to be kept in top condition with the following maintenance tips:
Inspect and Clean the USB Port
- Dust and Debris: The USB port on the Sync Module can accumulate dust and debris over time, interfering with the connection to a flash drive. Gently blow away any dust from the port using a can of compressed air.
- Physical Inspection: The USB port should be inspected for any indications of damage or wear. If the port seems loose or damaged, it might not form a secure connection with the USB drive.
Ensure a Stable Power Supply
- Power Source: The reliability of your Synce Module’s power source is important. Power strips overloaded with multiple devices must be avoided because it leads to power fluctuations and can mess with your Sync Module’s performance.
- Cable and Adapter Inspection: Always keep an eye on your power cable and adapter to make sure they’re not damaged, inspect for any damages such as fraying or kinks. The Sync Module’s operation can be disrupted by intermittent power caused by a damaged power supply.
Firmware Updates
- Keep Updated: The Sync Module receives periodic firmware updates from Blink, which can enhance performance and resolve identified issues. Make sure the Sync Module is connected to Wi-Fi to facilitate the automatic download and installation of these updates.
- Check Manually: The Sync Module’s firmware should be manually updated or announcements for updates checked in the Blink app occasionally to prevent numerous issues.
Optimal Placement
- Wi-Fi Signal: The Sync Module should be positioned to receive a robust Wi-Fi signal. A weak signal may cause communication problems between the Blink servers, your cameras, and the Sync Module, potentially impacting USB recording.
- Avoid Interference: Avoid placing the Sync Module near large metal objects and other devices that may generate electromagnetic interference, as this can disrupt Wi-Fi connectivity.
You can ensure the Sync Module operates smoothly and reduces the likelihood of Blink not recording to USB issue by regularly maintaining it. These actions can significantly improve a system’s reliability and performance: cleaning the USB port, ensuring a stable power supply, keeping firmware updated, and optimizing placement.
Blink Camera not Recording to USB: Advanced Troubleshooting Techniques
These advanced techniques provide solutions for those who have been unable to resolve the “Blink not recording to USB” issue through basic troubleshooting. They delve into less common but potentially effective methods.
Analyze System Logs
The Blink app or Sync Module, if accessible for the technically inclined, can reveal information about malfunctions through system logs. Search for error messages or unsuccessful USB recording-related actions.
Network Configuration Adjustments
The network settings, capable of being adjusted to prioritize Blink devices through Quality of Service (QoS) or assigning a static IP address for the Sync Module, can enhance the communication reliability between your devices and the network.
Experiment with USB Drive Partitioning
A dedicated partition on the USB drive can be created for Blink recordings to potentially enhance recognition and recording stability. The drive can be partitioned and formatted using disk management tools.
Seek Out Beta Firmware
Beta firmware versions for known issues may be offered occasionally by Blink for testing. Beta programs allow early access to solutions before they’re widely released for participation.
These advanced techniques are offered to be explored by users, providing extra options for those adept at technical solutions or in search of community guidance.
Conclusion
To conclude, the issue of Blink not recording to USB is often resolved by checking the format and capacity of the flash drive, ensuring compatibility, and performing system resets. These steps will allow you to be restored with functionality and confidence in securing your home once again with your Blink system.


")
