


Wondering how to connect Nanit to hotel Wi-Fi? Don’t worry! I’ve been in your position, and after not finding much information online, I decided to write this article. After reading my guide, you’ll know what equipment to use and the exact steps to connect your Nanit Pro, Nanit Plus, or Nanit Complete Monitoring System to hotel Wi-Fi. So, buckle up and let’s get started with connecting your Nanit to hotel Wi-Fi!
How do I connect my Nanit to Hotel Wi-Fi when traveling? (Quick Answer)
You can connect your Nanit to hotel Wi-Fi using a portable travel router like a TP-Link model, using a portable router helps you create private and secure network. First, connect the router to the hotel Wi-Fi using Hotspot/WISP mode. Then, log in to the hotel’s captive portal (if required) using your room number or last name. Once the router is connected, pair your Nanit camera through the Nanit app by following the in-app instructions.
Now, as you can see, connecting Nanit to hotel Wi-Fi is possible. To dive deeper and learn more about this integration, I’ve provided detailed instructions below, so I suggest you read on.
Challenges Ahead of Connecting Nanit to Hotel Wi-Fi
Before you learn how to connect Nanit to hotel Wi-Fi, it’s necessary to understand the challenges. Here are the main problems:
Public and Open Networks
Hotels often use open, public Wi-Fi networks that are less secure and may not support direct connections from devices like the Nanit camera. Because these networks typically lack password protection, the Nanit struggles to connect automatically.
Captive Portals and Authentication Pages
Many hotel Wi-Fi networks require you to log in with information like your room number or an access code because they use captive portals or authentication pages. The Nanit camera cannot navigate these portals by itself, posing another challenge.
Many hotel Wi-Fi networks necessitate login via a captive portal, which the Nanit camera cannot traverse independently.
Bandwidth Limitations
Hotels may restrict the amount of bandwidth available or the number of devices that can connect at once. This can impact your Nanit camera’s functionality and connectivity, potentially causing interruptions in monitoring.
How to Travel with a Nanit Camera? (The Necessary Equipment)
It is essential to gather the equipment necessary for connecting Nanit to hotel Wi-Fi. The vital items are:
- A portable travel router such as TP-Link models.
- Your Nanit Camera and a Multi-stand
- An Extension cord/power strip
Here’s what you’ll need to ensure a seamless process:
Travel Router
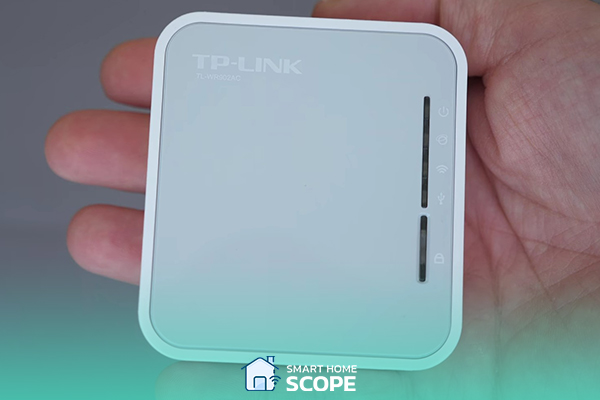
To set up a private, secure network that your Nanit can connect to, you need a portable router. I personally recommend the TP-Link travel router for its reliability and ease of use. It transforms the hotel’s open Wi-Fi into a network that requires a password, something your Nanit can connect to.
Nanit Camera and Multi-stand
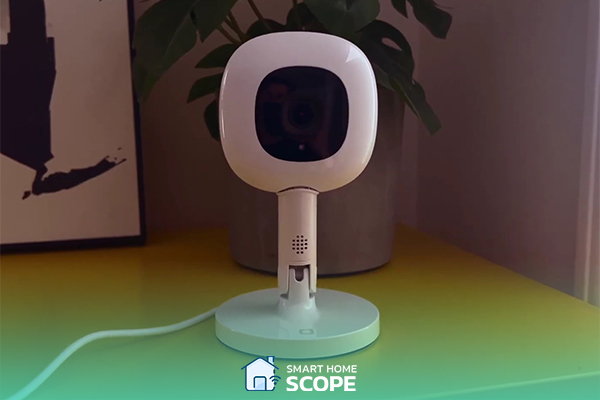
You’ll need a Nanit camera and a Nanit multi-stand if you plan to use it on the go. This stand allows you to securely set up the camera no matter where you are. It’s particularly helpful in hotel rooms with limited setup options.
Extension Cord/Power Strip
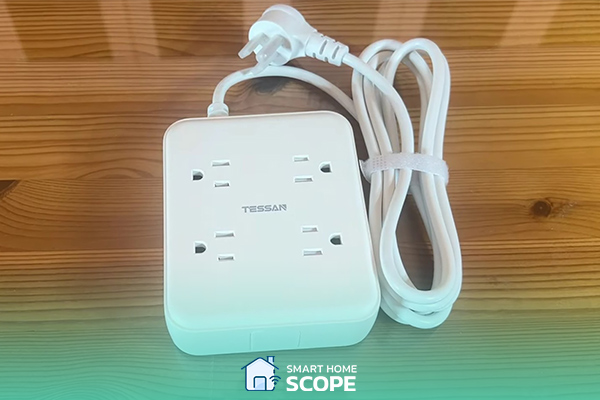
Hotel rooms often have few and awkwardly positioned power outlets. I always pack a multi-outlet power strip. This way, I can plug in the Nanit camera, travel router, and any other devices I need, ensuring everything stays powered without any problems.
How to Connect Nanit to Hotel Wi-Fi: Step-by-Step Instructions
Setting Up the Travel Router
Although configuring a portable router can be challenging at first, it’s simple once you get the hang of it. Here’s how I do it:
1. Choosing the Right Travel Router
start by selecting a mobile router that works well for you. I prefer the TP-Link and GL.iNet models are great choices because of their portability, reliability, and ease of use.
2. Connect Your Device to the Router
Use a USB adapter to plug the portable router into a power source once you get to the hotel. After that, using your laptop, tablet, or phone, look for available networks and select the router’s network from the list. The router’s manual or the back of the device often provides the network name (SSID) and default password.
3. Connecting the Router to Hotel Wi-Fi
Now it’s time to connect the router to Hotel Wi-Fi using Hotspot/WISP (Wireless Internet Service Provider) mode. To achieve this, follow these instructions:
- Load up a web browser and type in the router’s configuration URL (on TP-Link routers it’s http://tplinkwifi.net/) .
- The setup wizard guides you through setting up the router. Select the Hotspot/WISP option, which enables the router to establish a secure network by connecting to the hotel’s Wi-Fi. Ensure that, if requested, you choose Dynamic IP during setup.
- Search for available networks using the router in Hotspot/WISP mode. Choose the hotel’s Wi-Fi network from the list and establish a connection.
Important Note: I’ve noticed that some hotels use a system called a “captive portal” to manage their Wi-Fi access, which adds an extra login step even after connecting to the hotel Wi-Fi. To complete this final step, open a new window in your web browser and enter any website’s URL; you’ll then be redirected to the hotel’s login page. Typically, the login credentials for this page are either your last name or your room number.
Confirm the settings after connecting by making sure the router is online by visiting its status page. With this configuration, your travel router is transformed into a password-protected, private network.
Pairing Nanit with the Travel Router
The next step is to pair your Nanit camera with this new network after setting up the portable router. Here’s how I do it:
- Make sure your Nanit camera is plugged in and turned on first. Note that while traveling, your Nanit camera will work only with the multi-stand.
- On your phone, open the Nanit app, tap on the side menu and navigate to “Baby’s settings”.
- Scroll down to find and select an option labelled as “Network”.
- Tap on “Pair Nanit with your network” and follow the instructions which includes pressing a small pairing button on the back of the device until it starts flashing and choosing your router’s network.
- After pairing, I make sure everything is operating properly by checking the live feed twice on the app. This allows me to easily keep an eye on my child from anywhere in the hotel.
Amidst your travels, the Nanit camera functions solely with the multi-stand.
Troubleshooting Common Issues
There may be occasional glitches even with a good setup. Here’s how I resolve typical problems with my Nanit’s hotel Wi-Fi connection:
Dealing with Limited Bandwidth
The video quality may be affected by hotel Wi-Fi that is unreliable or has restricted bandwidth. If I see buffering or poor video quality, I try unplugging other devices from the network to free up bandwidth. Utilizing the portable router is beneficial since it can prioritize the Nanit’s connection over less important devices.
Ensuring a Stable Connection
To guarantee a steady connection, I position the travel router near the Nanit camera and away from any electrical equipment that could cause interference. Often, moving the camera or router just a few feet can make a big difference in the quality of the connection.
Overcoming Login Portals
If the hotel’s Wi-Fi requires a network login gateway, I connect the travel router to the network first and log in using my phone or laptop. Once the router has been authorized, the Nanit can connect without interacting with the portal.
If the hotel uses enterprise networks or protocols like 802.1x/RADIUS, which Nanit does not support, use the travel router to build a more straightforward network. As a last resort, consider using mobile hotspots but be aware of data and bandwidth limitations.
Ensuring 2.4GHz Compatibility
Nanit cameras, like many other smart devices, are designed to work with the 2.4GHz band due to its broad compatibility. If you’re experiencing connection problems, ensure that both your router and the hotel’s network support 2.4GHz. My TP-Link TL-WR902AC performs very well and keeps me satisfied with the connection.
Additional Tips for a Smooth Experience
Over time, I’ve picked up a few extra tips to ensure everything runs smoothly when using Nanit in a hotel:
Maximizing Video Quality
To obtain the best possible video quality, I make sure the camera lens is clean and in the right position. When using the Nanit with a SlumberPod, I position the camera sideways in the bag and press the plastic tightly against the lens to get a clear view.
To maintain steady white noise that sounds like home, the Hatch Mini Sound Machine can be a terrific companion. Additionally, travel cribs like the BabyBjorn Travel Crib and Guava Lotus ensure your baby sleeps comfortably
Ensuring Security
Security is crucial, especially when using public networks. I always change my travel router’s default password to something secure. This keeps my baby’s monitoring stream private and prevents unwanted users from accessing my network.
Managing Multiple Devices
The travel router is fantastic for managing our electronics because I can connect multiple devices without the hotel knowing. I can stay connected while keeping an eye on my child by easily connecting my phone, iPad, and laptop.
Conclusion
With the correct equipment and procedures, connecting Nanit camera to hotel Wi-Fi is manageable. By utilizing a travel router, setting it up correctly, and troubleshooting any issues, you can ensure a reliable connection and peace of mind while traveling. I hope now you know how to connect Nanit to hotel Wi-Fi! Safe travels and keep an eye on things!
FAQs
Does Nanit work on hotel Wi-Fi?
Yes, Nanit is compatible with hotel Wi-Fi; however, a portable router is often needed. Hotels commonly use open networks with captive portals, which Nanit cannot connect to directly. With a travel router in Hotspot/WISP mode, you can create a secure, password-protected network that Nanit can connect to.
Can you use Nanit on unsecured Wi-Fi?
No, Nanit does not function well on unsecured Wi-Fi networks due to security threats and connection issues. For reliable operation and to safeguard your baby’s monitoring feed, it is recommended to use a travel router to establish a private, secure network.
How to travel with the Nanit?
When traveling with the Nanit, you need the camera, a Nanit multi-stand, a mobile router, and an extension cord or power strip. To ensure seamless monitoring, set up the travel router in your hotel room, connect it to the hotel’s Wi-Fi, and pair your Nanit with this secure network.
What Wi-Fi do you need for Nanit?
Nanit requires a Wi-Fi network that supports the 2.4GHz band and at least 2Mbps upload speed, with strong signal strength. Your router must support WPA2 encryption, and network traffic should be minimal to ensure a reliable connection.
Can you connect Nanit to phone hotspot?
Yes, you can connect Nanit cameras to a mobile hotspot, but I don’t recommend it since the connection is unstable and not reliable.


")
