Vizio M70-C3 Calibration has really been a game changer in my home entertainment and it has totally been turned around because of the remarkable features that this TV has to offer. Although the initial display on this TV is acceptable, I believe it can be enhanced by some potential improvements. So, embark on this calibration journey with me to achieve the perfect picture on your M70-C3; in this guide, I’ll walk you through the step-by-step process.
Understanding TV Calibration
In poetic terms, TV calibration is a process that helps your TV sing in perfect harmony with your viewing environment! In technical terms, it’s a set of adjustments that you apply to your TV, such as changing contrast, brightness, white balance, and other display factors to achieve the most lifelike and immersive picture possible. By calibrating your TV, you can watch the content you desire exactly as the creator envisioned.
Vizio M70-C3 Calibration: Pre-Calibration Setup
Before we start with Vizio M70 C3 calibration, it’s important to note that the exact settings vary from person to person. For example, if you have a dark room, different settings must be applied for you compared to people with a bright room. This is an important thing during the process of smart TV setup that many people don’t consider.
Vizio M70-C3 Calibration: Step-by-Step Guide
Basic Picture Settings
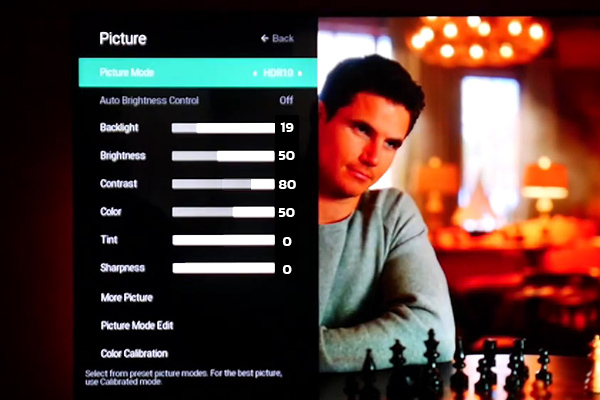
For basic Vizio M70-C3 calibration, go to the “Picture” section of your TV’s settings and implement the suggested configurations below.
- Brightness: I started with the brightness set at 50; this factor can be higher or lower depending on each individual room, so you need to play around with it to find the sweet spot for your room.
- Contrast: I personally prefer to set contrast to 80, as it really makes the images pop and reveals their depth and dimension. To demonstrate the difference, it’s like comparing a flat photograph to a vivid painting.
- Color: To maintain a balance between vibrancy and naturalness in colors, I set it to 50.
- Tint and Sharpness: I set both to 0 because this way the image is crisp and clean without any artificial enhancement.
- Backlight: Set backlight to 19 for brightness close to the 100 cd/m² calibration target.
Advanced Settings for Vizio M70-C3 Calibration
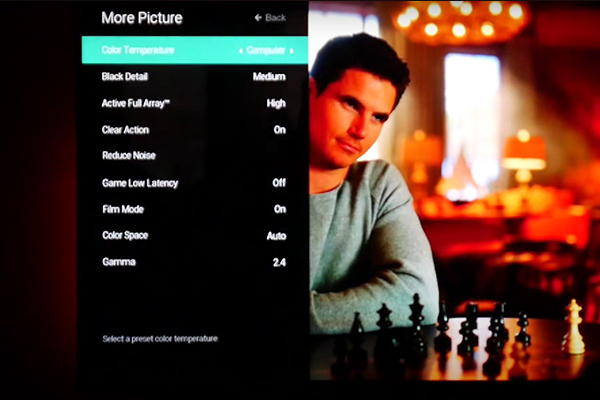
Access these advanced settings by going to the “More Picture” subsection on your TV’s settings.
- Color Temperature: My personal choice is “Normal,” but if you prefer a crispier and more vibrant feel, go with “Cool.”
- Black Detail: You can access Black Detail in the “More Picture” menu of the TV’s settings; setting it to “High” makes the black in the images pop significantly, which might be good for dark scenes in movies, helping you to see everything without losing the mood. Although it might be helpful, it isn’t matched with every taste, so again, I suggest checking it out yourself to discover whether you like it or not.
- Active Full Array: Turning it on brings better contrast to the screen, like the difference between a sunny day and an overcast one.
HDR and Dolby Vision Settings
The M70-C3 is an awesome TV when it comes to HDR content. By calibrating your M70-C3 for high dynamic range content you can bring out theit full potential. HDR can enhance the contrast in display, making the bright scenes truly bright and the dark scenes accurately dark. It can also provide wider range of colors, here’s how to calibrate you M70-C3 for HDR content:
- Picture Mode: Setting this to “Calibrated Dark” takes your viewing experience to another level for HDR content, because it is meant to elevate the display in dark scenes, making it a perfect choice for HDR content.
- Backlight: Set the brightness as high as you can. I suggest this because HDR content is equipped with higher levels in brightness, meaning that it helps you completely benefit from enhanced dynamic range.
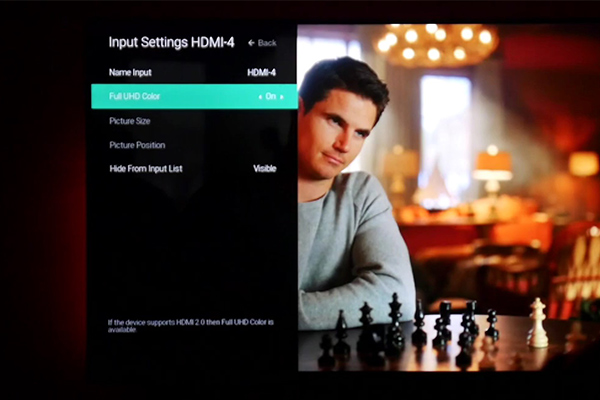
- HDMI Input Settings: Set the HDMI input you are using to “Full UHD Color”; this way, the range of HDR color and brightness data from external UHD devices such as Blu-ray players and gaming consoles, is fully received:
- Contrast & Brightness: Obviously you should set these to according to your room’s lightning conditions; but it’s good to set contrast slightly higher for HDR content since it can make the bright areas more appealing.
- Gamma: To get more details in darker scenes, set this to 2.2 which is a suitable value for a wide range of HDR content.
White Balance
The White Balance adjustment, a critical yet often overlooked element of Vizio M70-C3 Calibration, significantly influences the lifelike representation of colors on your screen.
Here’s what you need to know for optimizing white balance on your TV:
Individual Differences
Note that white balance settings are different among individual units of Vizio M70-C3, even if they are the same model. This is a natural thing in the process of manufacturing.
Calibration Equipment
You need to utilize professional equipment if you wish to calibrate your white balance precisely. These tools adjust and measure your TV’s color output, they aim to achieve the most accurate and natural colors possible.
The individuality that each unit has when it comes to white balance settings, make these tools important.
Types of Calibration Equipment
- Colorimeters: These devices analyze the color of the screen and guides you on how to configure the settings. This tool is often used along with a calibration software.
- Spectroradiometers: These are tools that professionals typically use, they are clearly more expensive and advanced than colorimeters and harder to work with; but their accuracy in color measurement is exceptional.
DIY Vizio M70-C3 White Balance Calibration
As mentioned earlier, you are trying to make the white colors appear truly white. If you accomplish this, other colors appear more natural too. Here’s how you can do it yourself, just make sure you are doing it in the lightning conditions that you usually watch TV:
- Make sure that the color temperature is set to “Normal” since it is a good baseline to optimize white balance.
- In the Picture Settings menu, select “Color Calibration” and then select “Color Tuner”; on the menu that appears, find the “11 Point White Balance” section; You’ll find options that make you able to tweak the levels of red, green, and blue (RGB). Remember you should play around with these settings until the whites appear natural to your eyes.
- User Reference Images: Using a reference image or a calibration pattern can help you with your adjustments. Such patterns can be found on the web or calibration Disks such as “Spears & Munsil” (to learn how to use this disk for white balance adjustments, read the white balance section of our TV calibration guide).
Gaming and PC Monitor Use
For gaming, make sure to enable “Game Low Latency” to get a more responsive and smoother action. For people who want to use the TV with a PC, turning on “Full Color 4:4:4” is really helpful since it makes the text and images sharp.
Color Space Adjustments
Set this to “Auto” to make the display adapt to various types of content automatically.
Motion and Clarity
- Xtreme Black Engine Plus: This is the local dimming feature on Vizio TVs; I personally suggest you turn it off; but again, it really depends on your taste.
- Clear Action: This is the option for the Black Frame insertion feature, and I tend to leave it off. If you want to make motion more fluid, you can turn it on. (You will see that the TV’s brightness decreases significantly after enabling this option)
- Film Mode: Turning it on removes judder from 24p sources.
Noise Reduction
Reduce Signal Noise and Reduce Block Noise: Turn them off for high-resolution content and adjust for older or low-quality content.
Vizio M70-C3 Calibration Beyond the Basics
You can implement the settings as suggested above to perform a basic calibration on your Vizio M70-C3 TV. However, after going with the settings above, you ought to bring out your personal taste to the procedure. For example, I always prefer more vibrancy in my colors when watching animated films or documentaries, so I turn the color saturation up a little.
The changes you make at this stage extremely depend on your own eyes, so trust them and play around with the display settings.
Common Mistakes to Avoid in Vizio M70-C3 Calibration Process
A frequent misstep in the process of Vizio M70-C3 Calibration, is over-calibration. This means that some people go beyond the mark in their quest for perfect TV settings. The true essence of calibration lies in striving for a harmonious and balanced setup that fits well with various content, not in seeking an overly dramatic visual.
If you are changing the settings constantly for various content types, you are doing it wrong! So, there are two main rules you need to remember: subtlety in optimization and being balanced in setup.
Conclusion
Use the settings mentioned in this article as a starting point for your Vizio M70-C3 calibration process; trust me, when you successfully perfect your viewing experience and achieve that excellence you wish to see in your display, that’s a real feeling of satisfaction! Don’t forget that you can tweak the configurations I suggested so it matches you preferences!
FAQ
How Often should I recalibrate my TV?
Calibration is mostly a one-time task; however, if the environment you watch TV in changes significantly, you may consider recalibrating your TV.
Can I use these settings for other Vizio models?
The display configurations mentioned in this article are particularly for M70-C3, but they can be a good place to start the calibration process for your model.
